
In this tutorial, we’ll make a sampler / looper. We’ll be building on the last tutorial which you can watch again here, and assume you have Pure Data installed and know how to load the finished patch onto the OWL using www.rebeltech.org.
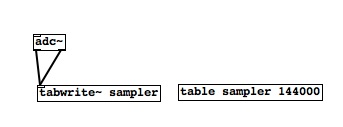
1.) Pure Data stores audio in an object called [table], so begin by creating this. It needs a name – which can be anything (I call mine sampler) – and a length, in samples. The sample rate of the the OWL is 48,000 hz, meaning that every second of audio is cut into 48,000 slices or samples. So, if we want to record up to 3 seconds of audio, we need the size of our table to be 144000 samples (3 * 48,000). 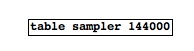 2.) To get audio into Pure Data and the OWL, we use an object called [adc~]. This has a left and right output, which correspond to the left and right inputs of the OWL. To record the audio input into the [table], we connect the [adc~] to the [tabwrite~] object. [tabwrite~] needs a name which tells it which table to write into, so here we call it [tabwrite~ sampler] – if your [table] object has a different name, you’ll need to use this.
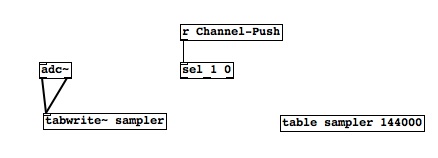
3.) We need a way to turn the recording (writing to the table) on and off, and for this we will use the push button on the OWL. To access the push button, use an object called [r Channel-Push] – the “r” is short for receive. This receives a 1 when the button is pushed, and a 0 when it’s released. To convert the 1 and 0 into something that [tabwrite~] can use, we use the [select] object, which can be written as [sel]. [sel] examines the numbers coming into it, and looks out for certain ones. It needs to be told what to look for – in this case, 1 and 0. It will output what Pure Data calls a “bang” when it sees a one or a zero. Because it has two “arguments”, 1 and 0, it has three outputs. The far left output sends a bang when the input is 1, the middle output when the input is 0, and any other inputs go out of the far right outlet.
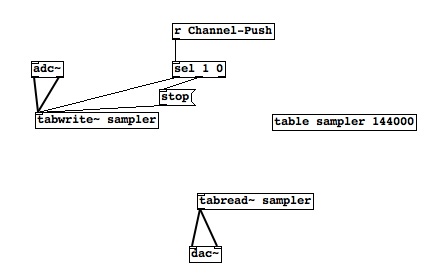
 4.) We can use the bang caused by the 1 to start [tabwrite~] recording, and the bang caused by the 0 to trigger a “stop” message. Notice how the message box looks slightly different to an object box. You can create messages using the “put” menu or keyboard shortcuts. Different objects have different sets of messages that affect their behaviour: right clicking on an object and looking at the help file will show you these messages. You don’t have to remember them all, and you’ll quickly pick up what sort of messages objects require (many, like “stop” to stop recording, are quite intuitive). To read samples from the table, we use the [tabread~] object, connected to the [dac~] for audio output. Again, [tabread~] needs to be told which table to read from, so in this case we call it [tabread~ sampler].
 5.) The input to [tabread~] tells it what point of the table to read back from, so to play back our recording we need an object which creates a repeating ramp from the beginning to the end of the table. We can use the [phasor~] object to do this, which creates a continuous ramp from 0 to 1 (notice how it’s got a tilde, which means its audio rate, so its outputting numbers 48000 times per second, giving us smooth playback). However, we don’t want it to go to just 1 – the end of the first sample – so we will multiply it by something. That something is dependent upon the length of the recording (which will of course change each time you make a new recording). We will create a [*~ 1] object for now, but notice how there is a right inlet. By inputting a number to the right inlet we change the “1” (even though that change isn’t visible on screen), and thus change what we multiply the 0 to 1 from the [phasor~] by.
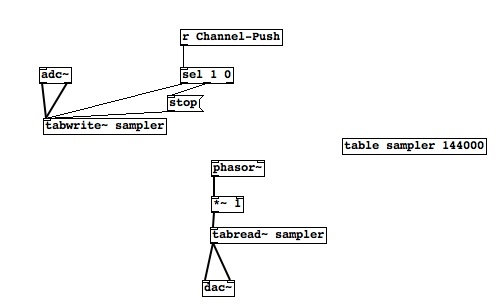
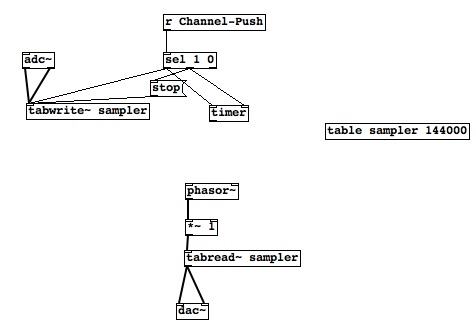
6.) As we just mentioned, the length of the recording will change each time we make a new recording, and we want to know what this is. The [timer] object will help us here. This has two inlets – right and left. The left inlet starts timing when it receives a bang, and a bang to the right inlet outputs the time in milliseconds, so we can connect it to the [sel] object controlling recording. In this way, starting recording starts the timer, and stopping recording stops the timer and outputs the length of the recording.
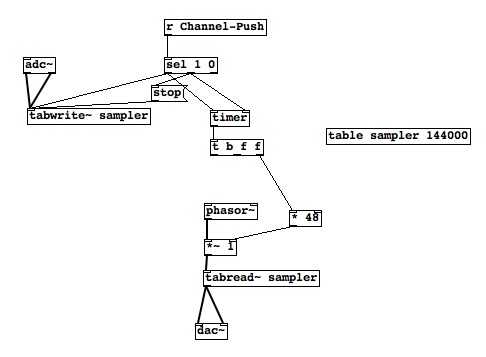
7.) Now, an output from the [timer] object tells us we’ve finished recording and want to start playing back the sample, so we want this output to make a few things happen. We want it to control the frequency of the [phasor~] – that is, how long it takes to get from 0 to 1 – so the recording is played back at the correct speed. We also want to know what to multiply the [phasor~] output by, so it plays the whole length of the recording. To make the one number output do several things, we use the [t] object (short for trigger). If we write [t b f f], it will output (in right to left order, from the different outlets) two floats followed by a bang. The float – or floating point number – is the time from [timer]. Inputting this float (which happens when recording is stopped) will then cause a series of events (the output of two floats and a bang) which will make sure the full length of the recording is played back at the correct speed. To begin, we use the third outlet – an f – to multiply the [phasor~] output. The length from the timer is in milliseconds, so we multiply it by 48 (because of the 48,000 hz sample rate), to get the length (in samples) of the recording (every 1s, or 1000 ms, is 48000 samples) which we can multiply the output of the [phasor~] by, so the 0-1 range of the [phasor~] becomes 0-end of recording.
 8.) We can use the remaining bang and float to trigger a maths operation that gives us the frequency of the [phasor~]. We do this by dividing 1000 by the length (in milliseconds) of the recording. This is when the right-to-left order of the outputs is important – the “f” is sent to the divide object’s right inlet, before the “1000” to the left inlet which triggers the calculation (for most Pure Data objects, it is an input into the right inlet which will make them do something). This is sent to the left inlet of the [phasor~] to set the frequency.
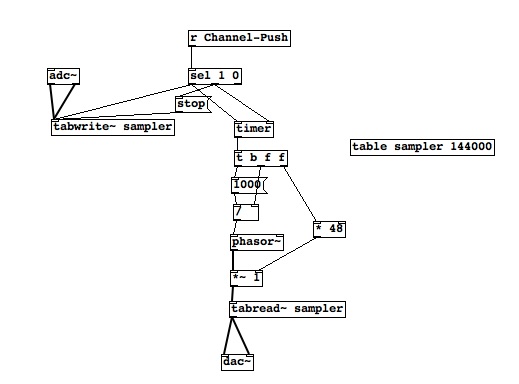
9.) We can test our patch if we want. We can use a toggle object to simulate what we’d get from [r Channel-Push], and if we turn audio on (using Media> Audio On, or clicking ‘computer audio’ in the main Pure Data window), we can use the toggle to record and loop our recording. Clicking on the [table] object will let you view the waveform of the recording.
You can download the patch from our patch library here: https://www.rebeltech.org/patch-library/patch/PD_Sampler_Looper_tutorial/