
This tutorial is a bit different to the previous tutorials. Instead of making a Pure Data patch to run on the OWL, we’ll be making a Pure Data patch that runs on your computer. The patch is a sequencer that lets you send triggers and CV as OSC (Open Sound Control) messages over WiFi to the Rebel Technology Open Sound Module. This opens up the door for lots of interesting ways of controlling modular synths from your computer (from Arduinos to biosenors!)
The tutorial relies on Pure Data 0.47-0, which is a different release to what we’ve previously used, but it’s free and has some essential objects for OSC. Download it here:
https://puredata.info/downloads/pure-data/releases/0.47-0
You can download the patch we’ll be building in this tutorial via Patchstorage:
http://patchstorage.com/rebel-technology-tutorial-3-open-sound-module/
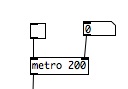
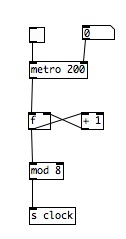
1.) At the heart of the sequencer is a clock. The clock is driven by the [metro] object (remember you can always look at the “put” menu to add new objects or find keyboard shortcuts). [metro] outputs bangs at regular intervals set using the right inlet and/or the initial argument (the number written after metro – control click or right click an object to view the help file for more info like this about what inlets, arguments and messages they expect). We will give the [metro] an initial argument of 200, so it sends out bangs every 200ms. It can be turned on and off using a [toggle] object (which looks like a clickable square), and a number box connected to the right inlet allows us to change the initial value of 200 to speed up or slow down the sequencer.
 2.) The metro outputs bangs, and we need to convert those into numbers to step through our sequencer, so we need to make a counter. We do this with the float object (written as [f] or [float]) and the [+] object. The [+] object needs an argument of 1 (ie [+ 1]), so it adds 1 to any number that enters the left inlet. The [f] object stores numbers that it receives in the right inlet, and outputs them when it receives a bang in the left inlet. If we connect the bangs from the outlet of [metro] into the left inlet of [f], connect the outlet of [f] to the input of [+], and send the output of [+] into the right (or “store”) inlet of [f], then we have a simple counter coming from the outlet of [f].
![]() 3.) The only problem with this counter is that it keeps on counting, and we want it to repeatedly go through the 8 steps of our sequence. The object that will let us do this is [mod]. This object divides the input by the argument and outputs the remainder. Therefore, [mod 8] will make our counter cycle from 0 to 7. We are going to use this master clock throughout the sequencer, so we use the [send] or [s] object, and in this case call it clock, so the object is [s clock]. This means wherever we put [receive clock] or [r clock] in the patch, we will get the master clock output (and everything can be in time, if you want it to be!).
3.) The only problem with this counter is that it keeps on counting, and we want it to repeatedly go through the 8 steps of our sequence. The object that will let us do this is [mod]. This object divides the input by the argument and outputs the remainder. Therefore, [mod 8] will make our counter cycle from 0 to 7. We are going to use this master clock throughout the sequencer, so we use the [send] or [s] object, and in this case call it clock, so the object is [s clock]. This means wherever we put [receive clock] or [r clock] in the patch, we will get the master clock output (and everything can be in time, if you want it to be!).
 4.) Now lets make a way of sequencing CV. We will use the [array] object, created using the “put” menu. Set the size to 8 (for the 8 steps), and right click or control click to adjust the properties, setting the y range to 1 – 0.
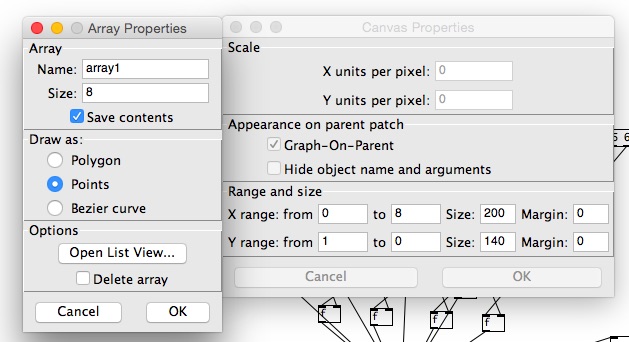 By adjusting the sliders on the array, we will be able to change the 8 notes in our sequence.
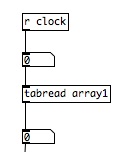
 5.) In order to retrieve values from the array, we will use the [tabread] object. [tabread] needs an argument to tell it which table (or array) to read from, so we call it [tabread array1].
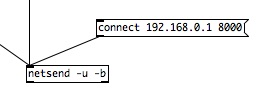
 6.) To send this data over OSC, we need to use the [netsend] object. This needs to be given two attributes, “-u -b” (because we are using UDP and binary), so it will look like [netsend -u -b]. We need to connect a message to it to tell it the IP address of the OSM module and the port to connect to – “connect 192.168.0.1 8000”
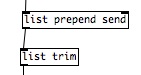
 7.) We need to format the data from our [array] object before it goes to [netsend]. We do this using the [oscformat] message. This needs an argument to give the osc path of the data. We want to send it to the CV out of channel A on the OSM, so the arguments are [oscformat osm a cv]. We then to to add “send” to this list, so we use [list prepend send]. Finally, we need to remove the word “list” from the list, so we use [list trim]. Remember, you can use the [print] object to see the outputs at different stages and what they look like.
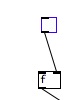
 8.) Next, we want to be able to send triggers with our sequencer. We can use a combination of [toggle] and [f] to do this. [toggle] will output 1 or 0, and this can be stored in [f], with 1 being a trigger.
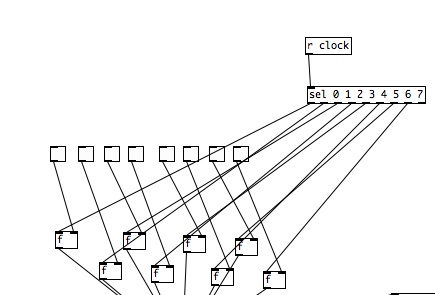
 9.) We create 8 of these, one for each of the 8 steps of the sequence. We can then use the clock to trigger them. If we connect [r clock] to [sel 0 1 2 3 4 5 6 7], the [sel] object will have 9 outlets (the last being for inputs outside the range to pass through), and send a bang out of each corresponding outlet: a bang from the first outlet when it receives a 0, from the second outlet when it receives a 1 and so on.
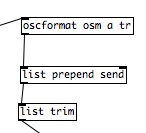
 10.) We can now connect this to the same objects to format it for osc, except the [oscformat] object is sending it as a trigger, so will be [oscformat osm a tr].
 11.) We’ve now built our sequencer! Make sure you are connected to the WiFi network created by the OSM module, click the “connect 192.168.0.1 8000” message, and you should be ready to go! Use the toggle above the metro to start the sequencer, trigger note ons by clicking the toggles, and use the array to change the CV output. You can hear the sequencer in action in the video, controlling the PolyBlep patch available here: https://www.rebeltech.org/patch-library/patch/PolyBlep/
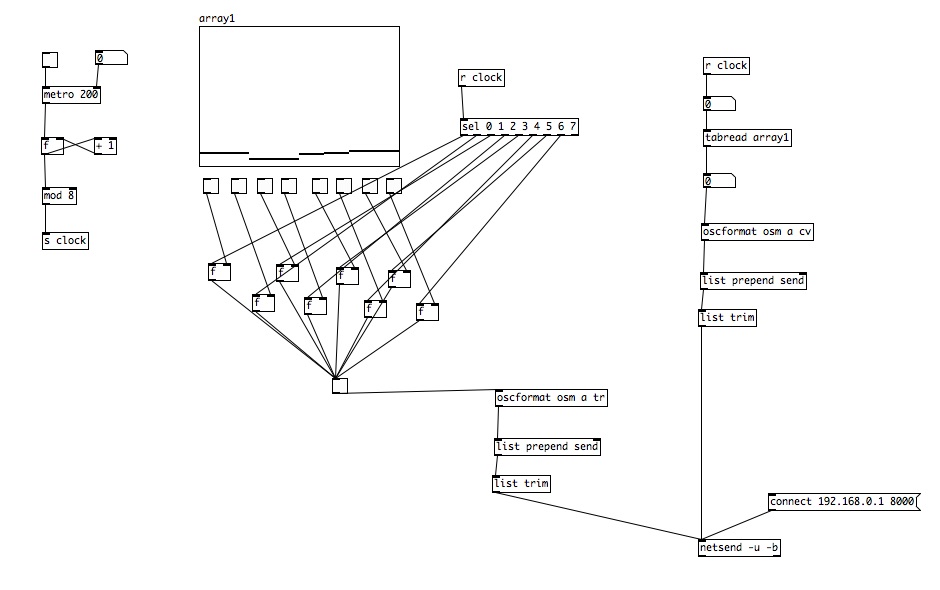 You can duplicate this to create a second set of trigger / cv sequencers for the OSM, using the [oscformat] objects with the arguments [oscformat osm b tr] and [osmfromat osm b cv].